A
compact, easy-to-build shortwave antenna
The Broomstick Special
By Arnie
Coro
Host of "Dxers Unlimited", Radio Habana, Cuba
This is
a "helically wound" wire antenna. It can be built in a few
hours... it will take longer if you really want to make it look
pretty... ugly versions can be assembled in minutes. It may
be used without an antenna tuner, but... it works best
when you do use a tuner.
Here are
the easy-to-follow, step-by-step building instructions for Arnie
Coro's "Broomstick Special":
1.
Obtain a nice broomstick.... you can use a "classic" wooden
dowel broomstick, or substitute heavy walled PVC plumbers plastic
tubing
2.
Diameter of broomstick is not critical; anything from about 1.5
centimeters or better will work (this means that PVC tubing of
about 19mm or 3/4 inch is ideal).
3.
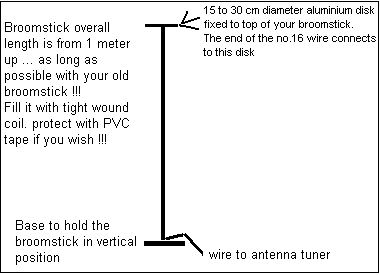
Prepare a base to hold the broomstick or PVC pipe vertical...
Use a wide base, with enough counterweight attached to keep the
broomstick vertical (I use mine next to the bedside radio, have
convinced the wife that it is "modern art"
4.
Obtain an aluminium disk of no less than 15 cm (6 inches) diameter.
I prefer using a disk of around 30 centimeters (12 inches) but
this is not critical. DO USE THE DISK... as it provides a capacity
hat termination and helps reduce NOISE PICK UP
5.
Obtain enough No.16 PVC plastic covered household wire; this is
the ideal choice, but if you can't find it, then you may use No.16
or No.18 enamel covered copper wire (the one used for winding
motors and transformers). If you can't find No.16 PVC covered
wire, then your second best choice is No.18 "speaker wire"
6.
Connect one end of the wire to the aluminium disk, and start winding
a uniform coil using the "broostick" as the coil form. Yoy want
a neat job! Turns should fit tightly one next to the other...
the "broomstick" will be filled with the wire forming the coil...
When you arrive at the bottom end, make a termination> I use
a long bolt with nuts and washers to which I tie the end of the
wire, and another wire that goes to the antenna tuner. This wire
that goes to the tuner can be from 1 meter to 3 meters long (from
3 to 10 feet) but do keep it as short as possible.
7.
After the antenna is built, you may want to protect it with tightly
wound PVC plastic tape over the wire. For extra protection, you
can paint the whole antenna with several coats of spray enamel...

8.
The antenna works best near a window. Or better yet, you can install
it in your balcony or garden... but do keep the connections
to the tuner short.
9.
The antenna is resonated with your antenna tuner.... you
may use it without a tuner, but results are not going to be as
good as when the antenna is connected to the receiver via a well-designed
antenna tuner
10.
Yes... you may use it for transmitting.... but... according
to recent medical research information, keep it as far away as
possible from your body!
11.
The helically wound "broomstick" is a lot of fun to experiment
with... It works best when you provide a ground connection to
the antenna tuner - receiver combination. One way of providing
an "artificial ground" is to connect a length of wire of no less
than 5 meters as a "counterpoise," that meaning that you can let
the wire hang around the room's floor or garden. Using the "broomstick"
with resonant radials turns it into an excellent amateur radio
antenna for a specific band... For example with 4 radials cut
for the 15 meter amateur band and a 4 feet high broomstick, (about
1.5 meters)
I can work
a lot of stations on 21 mHz, something I do often to demonstrate
to visitors what can be achieved with simple homebrew antennas,
even when you don't have a lot of space.
12.
For the technically minded:
Part 2 of The Broomstick Antenna -- click
here!
Radio
Havana, Cuba
6 February, 1998
 More from Arnie Coro on Radio
Havana Cuba
|


